By Doug Scott, Landscape Designer
Redeem Your Ground, Atlanta, GA
Like the spaces inside your home, you want your outdoor spaces to not only be attractive, but also reflective of you, and how you want to live outside. Unfortunately, almost every yard comes with views and other eyesores that you’d rather not look at.
But, have no fear. There are ways to address these not-so-attractive yard realities so that you, your friends, and family can fully enjoy your time outside.
Below are the three outdoor eyesores that clients most commonly ask me to address:
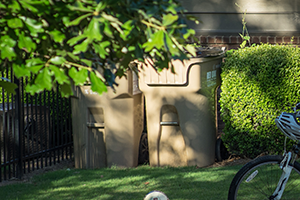
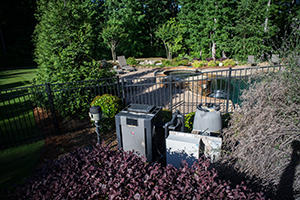
- Hiding those utilitarian necessities—like trashcans, HVAC units, utility boxes, water meters and pool pumps.
- Blocking the unsightly or unwanted views beyond their yards—like their neighbor’s driveway, garage or backyard.
- Bringing back to life those wimpy patches of grass that just won’t seem to grow.
If you’re dealing with any of these eyesores (you’re not alone), read on for practical ways to remedy them.
Utilitarian Necessities
Everybody has them—those unsightly metal boxes attached to our houses or near the street that keep the lights on, our homes at the perfect temperature and communications to the outside world open. Or, a couple of garbage cans conveniently placed just outside our garage. But nobody wants to see them. So, what do you do?
As with most things in your yard, you can approach it in one of two ways (or both): screen them with plant material or something man-made.
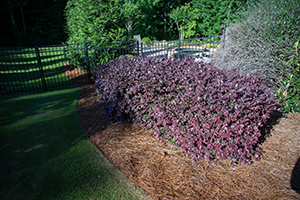
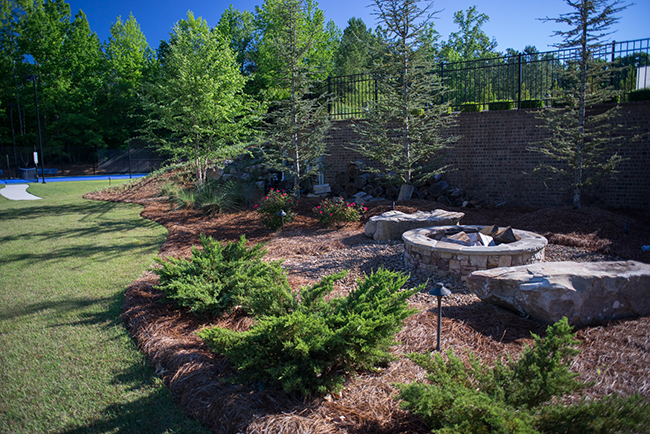
Let’s start with plant material. When choosing plant material, you want to make sure to pick the right plant for the right place. And what I mean by that is to choose plants that will thrive in the growing conditions where you’ll be planting them and still fit the space when they mature. In other words, you don’t want to plant something that you’ll have to constantly prune or won’t look healthy over time. Otherwise you’ll just be creating another problem that will have to be dealt with in the future.
Additionally, because your objective is to hide something, you want to make sure to pick plants that don’t lose their leaves (i.e., evergreen shrubs vs. deciduous perennials). There are a number of varieties of hollies, laurels, and distylium species that will fit the bill. Again, read the labels to make sure they’ll grow to the height you’re looking for and that the growing conditions are right for them to thrive (e.g., sun exposure).
Lastly, if you’re able (and as long as you maintain the necessary access), try to incorporate your plant material with the other planting beds in that space. This will help make things visually flow better, which will keep someone from seeing what you don’t want seen.
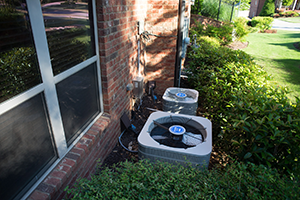 Unsightly AC Unit |
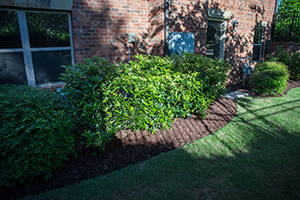 Covered Eyesore |
 Unsightly Pool Pump |
 Covered Eyesore |
[For more planting tips, check out the Layer Up video I did with Exmark in their ‘Done-In-A-Weekend’ video series.]
Next, are man-made solutions. The obvious choice in this situation is to add lattice or fencing in front of these eyesores. If you take this approach, look around to see what else is going on in your yard. For example:
- If you already have fencing, use the same or complementary material for your screen.
- If your house has horizontal siding, install horizontal lattice.
- Stain or paint it a color that already exists on your home or other outdoor structures.
Doing these things will make your attempts to hide something less obvious, allowing it to flow nicely with the rest of your landscape.
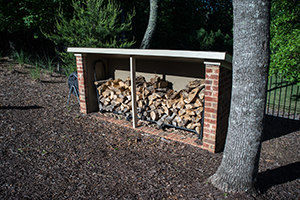
Additionally, you could use an existing man-made structure—like a firewood box or garden bench—to hide your utilitarian necessities.
 Unsightly Compost Bin |
 Covered Eyesore |
Note: Adding a man-made structure to hide a utility box only works if it is up against, or near, your house. In other words, if you’re hiding utility boxes near the street, then using plant material as a screen is probably your best bet.
Finally, you could utilize both lattice or fencing and plant material. If you don’t have much space to work with, plant a vine to grow on the fence or lattice rather than using evergreen shrubs that will take up a lot of room. Not only will this achieve your primary objective, but it’s a nice way to soften the hard lines of the man-made structure.
While the choice is yours, you’ll have more control by using something man-made, although plant material is often less obvious. Plants also require a bit more maintenance (at least to get established) and can always die, leaving you right back where you started. Regardless, whatever you do, the end result will certainly be more visually appealing than what you’re looking at now!
Unsightly Views
If you live in a neighborhood or more urban area, there’s a good chance that you’re looking right into your neighbor’s backyard or some other not-so-desirable view. But this isn’t just a problem for us urbanites. No matter where you live, there’s often something you want to block, or distract, your view from beyond your property.
And in this situation, blocking and/or distracting the views are the two solutions I’d recommend that you consider. Most of the time when I work with a client, they use the word “block,” but sometimes that isn’t the best option. Keep reading and you’ll see why.
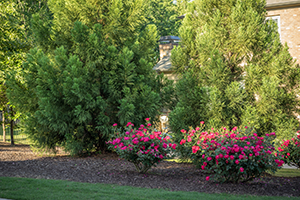
Like I mentioned above when dealing with utilitarian necessities, you have two approaches to block views beyond your property: either with man-made structures or plant material. The obvious man-made solution is putting up a privacy fence.
Unfortunately, there are limits to privacy fence height, and they only block views when you’re near the fence itself. That’s why many people quickly think of a line of 30-foot tall evergreen trees . . . that’ll do the trick! The major downside to this approach is the fact that if trees like these are that tall, they’re also very wide at the base (8- to 15+ feet). This means that you’ll either have less room to enjoy your yard, or you’ll have to cut them down and start all over again once they mature and eat up everything in sight.
 Neighbor’s Trash Cans / Toys |
 Covered Eyesore |
That said, if you do choose to use tall evergreen trees (like cryptomeria, deodar cedar, or several varieties of magnolia), let me suggest that you don’t put 15 of them in a row along your property line. Not only is a 30-foot tall wall of green a bit claustrophobic, it also doesn’t look natural and will only end up drawing attention to something you don’t really want to look at. Instead, look at specific aspects of the views you want to block and place groupings of 3-5 trees in a staggered fashion to strategically fill the most unsightly ‘windows.’
If you don’t have the kind of space required to use these behemoths and you don’t need to go 30-feet high, consider the larger varieties of some of the evergreen shrubs like hollies and laurels, as well as tea olives and certain varieties of ligustrum that I mentioned previously. Your best bet is to seek advice from a local nursery, and be sure and read the labels before digging your first hole.
Another option to consider is using understory trees to distract the views you don’t want to see. When I say understory trees, I’m referring to dogwoods, redbuds, crepe myrtles, serviceberry trees, etc. A lot of times, the reason you’re focusing on what’s beyond your property is because there’s nothing else to see. So give yourself something attractive to look at by using any of these tree options.
I have to mention, though, the downside to using understory trees is that they are deciduous (a fancy word meaning that they lose their leaves), so a good part of the year the only thing distracting your views will be their limb structure. But that may be enough. Your call.
The flip side of the understory tree coin, however, is that their flowers, fruit, changing leaves, and interesting bark and trunk structure will help add seasonal interest to your yard throughout the year, not to mention attract wildlife. And that’s a good thing for everyone!
Wimpy Grass
The other eyesore that almost all of my clients ask me to address is those pesky patches of wimpy grass. I won’t get into the nitty gritty of what fungal issue might be ailing your grass, but often times ‘wimpy grass syndrome,’ as I like to call it, is caused by one of three things:
- It’s simply the wrong grass for the growing conditions it’s planted in.
- It lays within a high-traffic area.
- And related to #2, the strip of grass is too narrow.
So, before you pull your hair out or work yourself to death trying to keep your wimpy grass alive, it may simply be that it’s not the right grass for the sun exposure where it’s growing. So if your grass needs 6-8 hours of sun but only gets 2, it won’t thrive there. It’s also possible that your sun exposure isn’t the same throughout your entire yard, so you’ll have to make a call on where you want most of your lawn and then grow something else in those other areas.
[Note: Some grasses that do best in the sun are Zoysia, Bermuda, Centipede and St. Augustine. Shade- tolerant grasses include tall fescue, as well as certain varieties of Zoysia and St. Augustine.]
Secondly, if you’re trying to grow grass where there is a lot of traffic, you may be fighting a losing battle. Turf grasses like Zoysia and Bermuda will take more traffic than fescue. But even then, you may need to raise the white flag if you’ve aerated when you should and exhausted all other maintenance options.
Similarly, even if your wimpy grass patch doesn’t get a lot of traffic, a narrow strip of grass may still be petering out. That’s likely because it’s so narrow you can only mow it in one direction. And eventually, over time, your grass will give up, as it just can’t hold up under those harsh conditions.
So, what do you do if you have wimpy grass? Most of your options are actually quite simple:
- If it’s not the right grass, plant the right grass.
- For high-traffic areas where you have a turf grass (e.g., Zoysia or Bermuda), if it makes sense, consider cutting in stepping stones through the area to essentially tell those walking through the space where to walk and where not to walk. Unfortunately, bunchgrass like fescue wouldn’t thrive in this type of situation.
- Let Mother Nature tell you where to grow grass and expand your planting beds so that the perimeter of your lawn lines only extend to where the grass will thrive. Then simply fill in the beds with plant material.
 Wimpy Grass |
 Covered Eyesore |
If none of these more obvious options work for you, you could plant a grass substitute, like dwarf Mondo. While it will give you the look of grass (though it’s not, so you won’t likely want to play football on it) it will take a good bit of time to fill in.
Whichever route you choose, I’m confident that one of the options above will help put your days of wimpy grass behind you.
Although these outdoor eyesores may be the bane of your existence today, with the right approach you can get them behind you and out of sight sooner than you think. Just make a decision and move in that direction. Hopefully these eyesore makeover tips I’ve provided will help you get on to the business of enjoying your time outside at home!