Posts Tagged ‘maintenance’

Helping your battery survive the winter months

Tuesday, November 16th, 2010

Your mowers’ batteries are no match for winter’s cruel, frigid temperament. Extreme cold can sap the life out of your battery, leaving you with nothing more than a new, heavy doorstop. Here are a few simple steps you can take to protect your battery from the bitter cold:

  • Always remove the battery from the machine and store it in a climate controlled area that stays between 50 and 70 degrees.
  • Put your battery on a trickle charger throughout winter. Or about a month before mowing season starts, put it on a trickle charger for at least a week, to recondition the battery and get it ready for mowing season. A trickle charger will give your battery a slow, deep charge that will help rejuvenate it after a period of dormancy.
  • Open up your battery’s ports and check to see if the fluids are low. If they are, fill them up with distilled water. Never use tap water to fill your battery.

This blog post is by David Martin, customer service manager at Exmark.

Fall maintenance, Part 1

Tuesday, October 19th, 2010

There’s nothing more important for extending the life of your mower than proper maintenance, whether it’s pre-season maintenance, in-season maintenance or fall/winter maintenance. Since summer is officially over (already?), we thought this would be the perfect time to focus on fall maintenance. You want your mower to be ready for the long, cold days ahead. Since the list is long, we’ll break up maintenance into two posts, so make sure you come back for the sequel.

A good cleaning.

Storing a clean mower is key. Your mower’ worked hard all summer long and deserves a good wash down. Which brings us to our first cleaning tip: never wash your mower with water or solvents. Water on steel results in rust and deterioration. Clean your mower with air. A leaf blower is a great way to clean a mower, or you can use compressed air.

Make sure you clean everywhere – lift up the seat, get under the deck, reach behind the tires, remove belt guards and clean the area underneath, really get into every nook and cranny. Any debris left on the mower can do one of two things: become a rodent nest or trap moisture. If you’ve already forgotten the first tip we gave you, here’s a recap: steel + water = rust.

Grease is good.

Your mower has bearings that need to be greased. This is the time to do it. Make sure you’re not only starting with fresh grease, but also using the right kind of grease for your machine and conditions. Your Exmark dealer will be able to help you in picking out the appropriate grease.

The greasing technique for the bearings is extremely important. In other words, don’t hurry through it or use shortcuts. Make sure you remove the load before you grease the bearings. If you try to grease bearings while they’re still under load, you’ll end up greasing only half the bearing. It’s worth your while to take your time and remove any belts and springs before employing the grease gun. If the bearing is moveable, we recommend that you move it three or four times to get a nice coating on the bearing. This is also a good way to inspect the bearings for wear and tear, making sure they move freely without any grinding or tightness.

Oil change

Like your car, your mower needs its engine oil and filter changed. It also needs its hydraulic fluid and filter changed. Once all of the fluids and filters have been changed, start the machine for about five minutes or less to make sure the clean engine oil circulates throughout the machine. Utilize the hydraulics to get the fresh fluid circulating as well. If changing your mower’s fluids isn’t your strong suit, take your mower to your dealer. Most dealers run a winterization special during this time of year. One of the benefits of having your dealer perform end of season maintenance is that they usually have a multipoint inspection of the machine that examines multiple wear points, catching something you may miss or not even think about checking. If they do find something, winter is probably the ideal time to have your mower serviced, since you won’t need it in the field.

That’s it our first segment of fall maintenance. Check back soon to see more tips on what you need to do to maintain your mower.

This blog post is by David Martin, customer service manager at Exmark.

Fall Clean-up

Thursday, October 14th, 2010

As mowing season winds down, pros need to start thinking about fall maintenance and winterizing their mowers. But before we get ahead of ourselves, let’s talk fall clean-up.

Picking up extra debris and keeping customers’ yards clean sometimes can be more difficult than it should be. But using the right tool, like Exmark’s UltraVac system, can keep a simple clean-up job from turning into a big production.

Something else to consider is your blades. More times than not, we get calls from pros telling us that their mowers aren’t picking up extra debris, like twigs. The issue is often blade related. Regular blades do a great job of bagging grass clippings, but leaves need to be chopped up into very fine pieces to move quickly and efficiently through the tube. Extreme blades are designed for this job. They’ll get more debris in the bag, and you won’t have to stop as often to empty it.

One last thing to check is your deck setting. If your deck isn’t set at the correct level, your mower won’t be able to pick up debris. Your local dealer can help you get your deck to where it needs to be.

This blog post is by David Martin, customer service manager at Exmark.
Once again, let’s talk lubrication.

Thursday, September 23rd, 2010

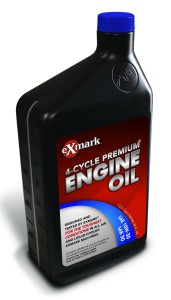
EngineOil_FrontIt’s true we have multiple posts discussing lubrication. (Three to be exact, but who’s counting?) But as you’re wondering why we’re getting stuck on this one topic, just remember that proper lubrication extends the life of your mower.  And, we want you to help keep those bad boys working hard for you for as long as possible.

So here’s the breakdown on what you need to know and what you should be doing:

  • Change the engine oil after the first five hours of operating a new mower.
  • Your first hydraulic oil and filter change should be at 200 hours.
  • After initial hydraulic oil and filter change, and if you’re using genuine Exmark Hydraulic Oil, change the oil and filter at maximum every 500 hours.
  • If you’re using Mobil 1 Oil, change the oil and filter at maximum every 250 hours.
  • If you are mowing hills or running bagging equipment, change hydraulic fluid and engine oil much more frequently than manufacturer’s maximum recommendations.
  • Use a high-quality oil since less expensive grease or generic brands might cost you more in the long run.
  • Engine manufacturers do not recommend the use of synthetic oils.  Find more information on Exmark’s YouTube channel at www.youtube.com/exmarkmanufacturing.
  • You have the option of using Exmark-branded engine oil, which is specifically formulated for mowers.

Did you find this post helpful? Leave us a comment below.

Mid-season mower maintenance

Monday, August 30th, 2010

Now that mowing season is well under way, the last thing you want to happen is for your mower to experience downtime. The following tips will help you keep your mower running in tip-top shape.

  • Check your operator’s manual to see what might need to be greased!  Keeping the right parts greased is an important step in extending the life of your mower.
  • Check the air filter (inner and outer) and change it if necessary.  Never use compressed air to clean a filter.
  • Depending on how many hours the mower has been running, consider changing the fuel filter.
  • Check and, if necessary, change the spark plugs.
  • Verify that you are doing the oil changes at the proper intervals.  You should NEVER exceed the manufacturer’s recommendations by more than 100 hours.
  • Blow the debris off the unit
    • Remove the belt deck belt shields and blow off all foreign material.
    • Blow the grass off the areas around the pumps and wheel motors (overheated oil leads to shorter component life).
    • Blow through the openings in and around the console or remove the console mounting screws to get debris out of this area.
    • Check for loose hardware.
    • Verify torque on wheel motor castle nut and tire mounting lug nuts.

How is your season going? If you have any comments or questions, we’d love to hear from you.

Dealer-scheduled Maintenance is Key

Sunday, April 4th, 2010

This is the final post in Exmark’s ten part Service and Maintenance Series.

Even if you are a do-it-yourselfer, it is important to realize that the dealer is your best friend when it comes to extending the life of your mower.

Your local dealer knows the conditions you mow in, your local area, your machine and how you use your equipment to get the job done. Your local dealer can also recommend a customized maintenance routine for your unit that ties directly to how you use it, which is going to be better than any generic manufacturer maintenance program available.

It may save you money to do things yourself in the short run, but since dealers are factory-trained to fix and spot issues before they become serious problems, they could save you time and money in the end. Dealers are also aware of any out-of-the-ordinary maintenance routines or new and improved repair methods sent directly from the factory. Exmark recommends that even the do-it-yourselfers make the effort to find a dealer they trust. And then making that dealer their best friend.

Regular maintenance cycles are important for the longevity of your equipment. Whether you are a homeowner or a commercial landscaper, knowing the most important parts to check and what types of maintenance needs to happen regularly is key to having beautifully cut grass this spring and a successful landscaping season.

That concludes our maintenance series. Hope you found it helpful in getting ready for a positive and profitable mowing season. The series will be archived on this site so you can refer back to the posts at any time.

Walk-behind Versus Riding Mower Maintenance

Thursday, April 1st, 2010

This is the ninth post in Exmark’s ten part Service and Maintenance Series.

While there aren’t major differences in the mower maintenance of walk-behind and riding lawn mowers, it makes sense to look through your individual unit’s manual for recommended maintenance schedules. The frequency and proper methods for maintenance will need to be a marriage of the manufacturer recommendations and your regular machine usage conditions. Typically, mowers differ in the hours needed between scheduled maintenance including oil changes, hydraulic fuel checks and greasing of the joints and connections.

Since your equipment may have been in hibernation for the last three to four months, it’s probably time for a bit of a refresher. After you run it for 50 hours into the season, try conducting another maintenance cycle to refresh the fluids and check the nuts and bolts. This will help your equipment last longer and kick-start your season successfully by getting the cobwebs off the machine.

Next we’ll be talking about dealer-scheduled maintenance, so check back soon.

Fresh Air Filter

Monday, March 29th, 2010

This is the eighth post in Exmark’s ten part Service and Maintenance Series.

Your engine needs to breathe. It does so through air filters—preferably, clean air filters.

So just like the oil in your engine, you should check air filters on a daily basis. It’s essential to clear the filter of debris. If the filter gets clogged at some point, the engine will find other ways to breathe, through any available gap or crevice. Typically, these crevices don’t have filters and will allow the machine to suck in dirt, sand and debris to places where they really shouldn’t go. That’s why there’s a filter in the first place.

It’s also important to note that you should never clean your air filters with compressed air. This can cause holes to form in the filter and it will cease to keep unwanted particles out.

In the next post, we’ll discuss walk-behind versus riding mower maintenance, so please check back soon.

When it Comes to a Quality Cut, It’s All About the Blades

Thursday, March 25th, 2010


This is the seventh post in Exmark’s ten part Service and Maintenance Series.

The purpose of the mower is to cut grass, and the whole process starts with the blade. A mower with dull blades has to work harder and usually results in shredded rather than cleanly cutting grass. Keeping your blades sharp and replacing worn blades will deliver a better quality of cut, resulting in happy customers.

The correct angle to sharpen a blade is 28 degrees. Users should sharpen blades and replace damaged blades after every eight to 10 hours of use, or even more frequently under certain conditions. As mentioned, a dull blade forces other parts of the mower to work harder, including the belts, bearings and engine. The harder those parts have to work, the more inefficient your machine becomes.

Having a balanced blade is also extremely important to the overall longevity of your machine. An out-of-balance blade can cost you more than the price of a new blade. That’s because unbalanced blades actually swivel and wobble, causing the solid metal of the deck to flex many times per second. Not surprisingly, unbalanced blades can take a toll on bearings, significantly reducing their life span. This will eventually lead to damaging the deck shell itself, which is one pretty expensive problem to resolve. Thankfully, there are inexpensive blade balancing tools out there, and you can remedy the blade balance before it turns into an even bigger issue.

Better yet, we recommend keeping several extra sets of sharp, balanced blades on hand. Having these blades available will save you fuel and money in the long run. It doesn’t take much to make a big difference in the overall performance of your blade. If you’re looking for more information on blade maintenance, visit our YouTube page here.

Our next post will cover air filters. Remember to come back soon.

The Nuts and Bolts of Dealing with Nuts and Bolts

Thursday, March 18th, 2010

This is the fifth part of Exmark’s ten part Service and Maintenance Series.

Hi again, David Martin, customer service manager for Exmark.

Before you start cutting grass this spring, make sure the connectors on your equipment are in working order. With most units, the number one connection to check is the castle nuts. These points are essential to test because if they become loose, your wheels could fall off the unit, and we can’t stress how dangerous a situation that can be. Problems with your wheels or castle nuts could also cause damage to the wheel motor—one of the more expensive parts on the equipment to repair.

It’s ideal to check the bolts after the first 100 hours of operating a machine; after that, every 500 hours is adequate. By doing this, you can proactively maintain the least expensive items on the machine before they lead to expensive, larger unit repairs.

The motion control dampers are items that should also be maintained regularly because the deterioration of this piece leads to problems with other, more expensive parts of the mower, like the wheel motor.

So keep an eye on your nuts and bolts for normal wear and tear, and replace them accordingly. It’ll help you save a lot more than money.

Up next in our series, storing your mower’s fuel, so come back soon for the latest post.